

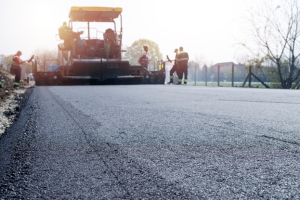
When you’re getting ready to install asphalt on a driveway, parking lot, or road, the first step is to tear out the old concrete pavement. This is an important first step because asphalt needs a strong, flexible base to hold up for years without cracking or potholes. By taking the time and effort to prepare the surface properly, you will ensure that your new asphalt pavement project will be durable, smooth, and professional looking. Having a good removal process also makes later items like sealcoating and striping easier to accomplish with precision. Proper preparation also sets your project up for long-term success in residential and commercial paving projects.
Tools Needed for Removal
Removing concrete is more than just a hammer and chisel job. You are going to need some heavy equipment and safety equipment to do a proper job. Check this link for more tips.
Here are the main tools you should assemble before starting:
- Jackhammer (or sledgehammer) – You will want to break up the concrete surface.
- Concrete saw – The saw will be able to cut through thick slabs and create manageable pieces.
- Wheelbarrow and shovel – For removing and hauling broken chunks of concrete.
- Crowbar or pry bar – To lift and separate chunks of concrete.
- Work gloves, safety glasses, and steel toe boots – For your personal protection.
Also, if you are doing a larger job involving a reconfiguration of parking lot striping, or a full road construction project, you may want to give some consideration to renting skid steers or mini excavators to make the removal process quicker and more efficient. In most instances, renting tools will provide significant savings versus purchasing because this is a one-time job. Even with smaller do-it-yourself jobs, having the proper tools will provide safety and efficiency in the work.
Safety Steps When Breaking Concrete
Concrete breaking comes with dust, noise, and flying debris. Safety is an important matter to address before you start hammering away on the concrete. The first safety item to deal with is verifying you do not have utility lines below the slab. Gas, water, or electrical line needs to be marked and avoided.
To remain safe during the job:
- Wear a respirator or dust mask to avoid or limit inhaling concrete dust.
- Use hearing protection when using loud equipment, such as jackhammers.
- Ensure that you keep bystanders away from the work area, especially children or pets.
- Break the concrete into smaller sections in order to maintain control when lifting.
Even while performing a residential driveway paving project, these considerations will help the job continue to be efficient and safe. Frequent breaks will also assist in alleviating fatigue, as possible, which can lead to accidents when using heavy tools.
Proper Disposal Methods
Once the concrete is broken apart, the last hurdle is disposing of the debris. Leaving behind piles of rubble will slow down your project and may also be in violation of local codes.
To properly dispose of the rubble, consider:
- Renting a dumpster which will allow you to haul off a large amount of debris.
- Contact your city’s waste services and request information about bulk pickup methods.
- Recycle your concrete by bringing it to a facility that crushes it into gravel.
Some DIYers will even use the broken concrete as fill for other construction work. However, for a professional asphalt installation, we recommend cleaning the site completely not only for aesthetic purposes but also so the sub-base can be done correctly. A clean site is important in ensuring that your concrete to asphalt conversion Nashville project holds up to quality standards. A lot of recycling centers will take concrete for free or for a minimal fee, which also allows you to stay within your budget. Taking the time to schedule disposal ahead of time will ensure your project continues to move along without delays.
Preparing the Sub-Base
Once the old concrete is removed and disposed of, the next step is preparing the sub-base. This is the base where your asphalt layer will sit, and if it is not prepared correctly, your pavement will develop ruts and cracks faster than it should.
To prepare the base correctly:
- Compact the sub-soil with a roller or plate compactor. Read more here https://www.sciencedirect.com/science/article/pii/S0038080622001160.
- Fill it with crushed stone or gravel if needed. The gravel will give you a level surface area to work with and also provide drainage.
- Make sure you level it out so all asphalt has the same thickness.
Proper sub-base preparation is as important for the sealcoating and ongoing maintenance of your parking lot as it is for the original installation. A solid foundation will reduce your long-term repair costs and will improve the longevity of your asphalt surface. In many cases of installing asphalt, professional paving contractors will actually test soil stability before applying the gravel base to ensure the surface can handle traffic loads. Leaving this step out may cause premature wear, especially with heavy vehicles.
Common Mistakes to Avoid
You can never be too careful. Even experienced contractors make mistakes when removing concrete and preparing for asphalt. Knowing some of the common mistakes will help you potentially avoid them, saving you time and money.
Here are some things to avoid:
- Leaving debris underneath the new asphalt – Even small pieces of concrete can cause bumps or weak spots.
- Not compacting – Loose soil or gravel will move under pressure, which leads to cracks.
- Ignoring drainage – If you do not have a slope where water can drain, it will pool and eventually damage your new asphalt surface.
- Hurrying – Make sure you check off everything through the entire project, from debris removal to grading before you rush into this project. You will prevent wasted money on repairs.
If you perform each of these steps in order and with care, you will have a strong base which guarantees a durable driveway, parking lot, or road. We encourage the novice paving contractors and home improvement DIYers to treat this process as a way of getting it right the first time. If you make a mistake at this earlier stage, you may shorten the lifespan of your pavement for many years.


